

After two weeks of spring, we’re back to snow, and frankly, everyone around here has been a little bummed about it. I had already moved on to outside play in my head, but with the temperatures hovering around 20, an hour-long nature walk just wasn’t in the cards.
When in doubt (and indoors!) I always turn to creative dramatic play prompts, and restaurant themes are always one of our favorites.

Another of my favorite things is finding ways to incorporate learning about new cultures, foods, and languages into the mix. With this no-sew sushi set, I was able to do all three!
Note: We prefer to shop locally or use what we have at home, but this list contains Woodpeckers Crafts, Etsy, Blick Art Materials, Bookshop.org and/or Amazon affiliate links for reference. As affiliates (and Amazon Associates), we make a small commission on qualifying purchases.*
BASIC DIY SUSHI PLAY SET SUPPLIES:
SERVING TRAY SUPPLIES:
OPTIONAL SUSHI PLAY EXTRAS:

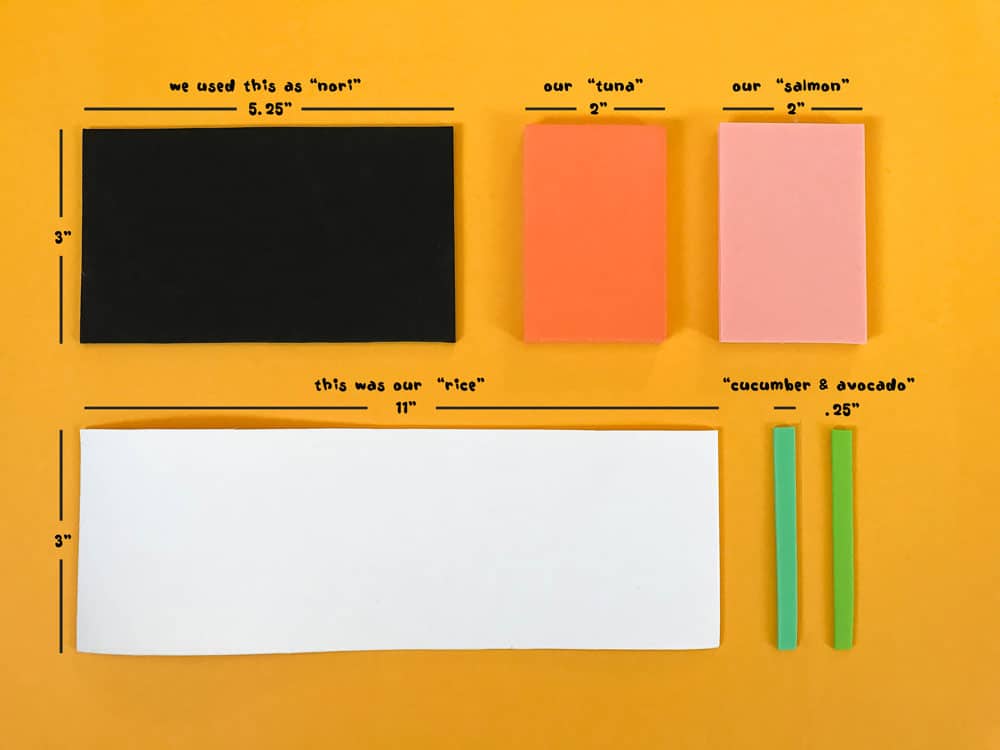
Gather the foam or felt pieces for the sushi and nigiri “ingredients.” You can eyeball this and play around with sizing on your own – but if you’d prefer to use ours as a template, I’ve laid out the dimensions we used below…
Rice = (1) Piece of thin white foam/felt cut to 11 inches by 3 inches
Nori = (1) Piece of thin black foam/felt cut to 5.35 inches by 3 inches
Tuna = (1) Piece of thick orange foam/felt cut to 2 inches by 3 inches
Salmon = (1) Piece of thick peach foam/felt cut to 2 inches by 3 inches
Cucumber = Multiple 1/4 inch strips of thick green foam/felt
Avocado = Multiple 1/4 inch strips of thick light green foam/felt
We used a couple of wooden blocks for the rice bottoms of our “nigiri” – paint these white, and let them dry for about 30 minutes (dependent upon what kind of paint you’re using).
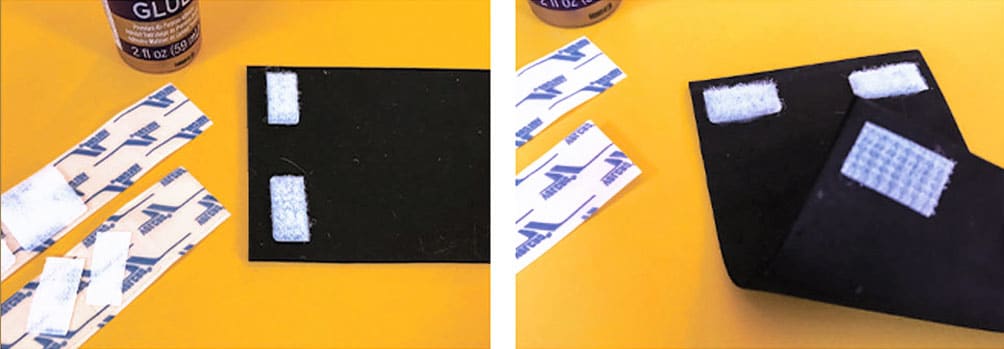
Once you have all of your foam sushi pieces cut, add a couple of velcro pieces to the front (and then opposite side and back) of whatever you use for the outer wrap piece.
We found that simply using the adhesive-backed velcro worked well to test placement, but the adhesive wasn’t sticky enough to hold for long-term use.
Use a few dabs of craft glue on the back of each velcro piece, place, and let dry until completely set (about 30-45 minutes).
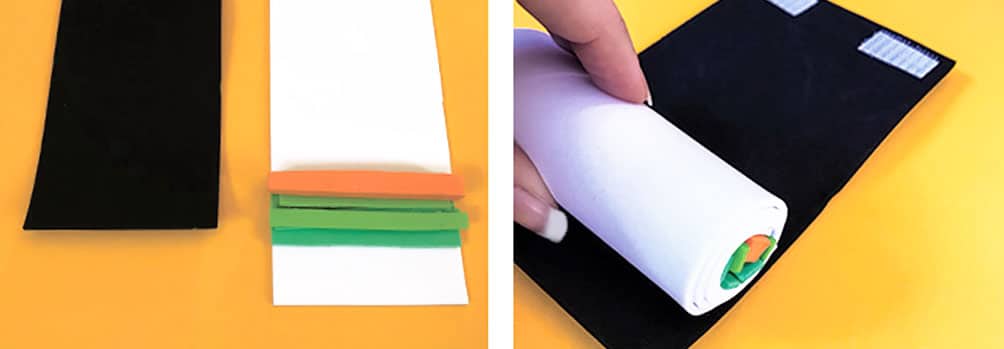
When the paint and glue have dried completely, you’re ready to roll! We cut quite a few extra “ingredients” and made a few different sizes of rolls so we could make all different kinds. The kids have had a great time figuring out different ways to roll them up and secure them.
For the littlest ones, it was easiest to pre-roll a couple of the smaller pieces and tie them securely with a long strip of play foam. We discovered that the larger and longer the rolls are, the easier they are for little hands to work with.
If you want to make a serving tray exactly like ours, start by painting the legs (if you’re staining the wood, do that now as well – we did not) let dry for about an hour, then glue each square rod onto the wood board 2″ from the sides.
Flip over, and boom – you have a lovely little tray for serving your play sushi and nigiri!

Children can use the sushi set to set up their own restaurant and play different roles, such as chef, waiter, and customer. This can help them develop social skills, understand different roles and responsibilities, and boost their imaginative play.
Having grown up playing “restaurant” with my sister, I have vivid memories of both of us obsessing over those little guest order check pads (remember those??) – we got a set at Christmas one year, and you would have thought there was a puppy in the box!
So just for fun, I threw together a little play sushi menu printable set you can customize, print, and use along with your own sushi set!

Eco-Friendly Play Tip: pick up a package of self-laminating sheets (like these), and you’ll only ever have to print out 1 or 2 sheets (plus, the kids I made these for all agreed that laminated menus are WAY more professional).
Besides boosting creativity, this exercise can help enhance children’s communication and negotiation skills. For instance, they’ll have to discuss who plays which role, what’s on the menu for the day, how to serve customers, and so forth. This form of cooperative play can also foster teamwork and leadership skills.
This sushi set can be a practical tool to make learning math fun and relatable. Kids can use the sushi pieces to learn basic counting, addition, and subtraction. For example, give them small tasks such as “Make an order with five sushi pieces” or “Add two more pieces to the existing order.”
Kids can also learn multiplication and division by creating multiples of the same sushi order or separating an order onto two or three plates equally. This hands-on approach can help to reinforce math skills and bring abstract concepts to life.
Assembling sushi pieces can help kids to develop their fine motor skills. The small pieces are a good way for children to practice their precision and hand-eye coordination. You can also grab chopsticks and practice picking up the pieces (it’s also much less messy and frustrating than practicing with actual food).
The process of picking up, arranging, and manipulating sushi pieces can provide kids with essential practice in using their small muscles, such as those in the hands, fingers, and wrists. Over time, this could improve their dexterity, which is a vital skill for writing, buttoning clothing, and other daily activities.
This activity can spark interest in learning about other cultures and their cuisines. It could also encourage respect and appreciation for cultural diversity. You can further this learning by introducing related Japanese traditions, language, and etiquette.
Discuss where sushi comes from and its importance in Japanese culture. Kids can learn about the art of sushi making, and how food varies across different cultures.
Provide kids with ‘recipe cards’ that show the order of assembling different types of sushi. They can follow these cards to create the correct sushi, teaching them about sequencing and order.
Understanding sequences is a crucial part of early math and literacy development. Following ‘recipe cards’ to assemble sushi in a particular order can introduce kids to the concept of step-by-step processes, which is a fundamental aspect of coding, baking, storytelling, and many other skills.

Create a game where children have to remember and recreate specific sushi orders. This can help improve their memory and concentration skills.
Not only do memory games boost cognitive development, but they also improve attention span and cognitive flexibility. Such games encourage kids to rely on their visual memory and recall abilities, which can also enhance their academic learning.
Children can categorize the sushi pieces based on various parameters such as color, type, ingredients, etc. This can enhance their logical thinking and problem-solving skills.
Sorting and categorizing are early math skills that are fundamental to understanding more complex concepts later on. By classifying sushi pieces, kids can enhance their analytical thinking, observation skills, and cognitive development, preparing them for higher-level problem-solving and decision-making.
For those who want to go ALL in on this and make a day of it, why not try making some sushi? We have run across some super-fun non-traditional recipes for the pickier eaters and some more traditional, simplified versions for budding foodies and young sushi chefs.

Make our cardboard French market food set or paper-mâché food-on-a-stick for a round-the-world DIY play food tour!
For a BIG collection of more kitchen play activities, our favorite kids’ kitchen tools, and printable safety rule templates, visit our hands-on kitchen learning list!
*A note about affiliate links: We strive to use simple, earth-friendly supplies that can be purchased locally whenever we can, but sometimes we find the best universally available options, a rare eco-friendly find, or a niche product only available on Blick Art Materials, Amazon, Etsy, or Woodpeckers Crafts. When included in our supply list, these products are affiliate links, and if you click through to make a purchase we receive a small commission that helps us re-order these supplies!
GETTING READY TO TRY this?
I love seeing all the ways people make these ideas their own! If you're sharing the results of one of our projects, mention or tag me with @barleyandbirch, or share it in the comments of one of our Pinterest project pins.


