
Surf’s up in the Midwest, yo! As someone who used to live steps from the Pacific and did a lot of ocean swimming, bodyboarding, and even some surfing, there are still so many days I wake up itching to hop into those waves!
So I decided to DIY the next best thing for a corn-country gal on a limited budget and make a surf-inspired balance board.
If you’re lucky enough to live by an ocean, this is the perfect way to help younger kids ease into surfing. If you live in the middle of endless fields (like I do) this is an awesome substitute for the real thing and a great balance trainer.
Take it out in the sun, turn up some surf tunes, and it’s about as close to the Pacific as the Midwest gets!

Whether you’re hanging ten (five for pros), practicing your popups, or just rolling around having fun, this is the perfect summer sports toy for kids and adults.
And by making it myself, I saved more than $115!! Brand name balance boards usually run anywhere from $50-$180, but I spent a total of $35 on supplies for this beauty of a board (including some of the extra stuff to make it look cool – like wood stain, decorative stripes, and grip tape).
Don’t have some of the tools or supplies, don’t worry! This is incredibly easy to modify.
This particular board size is recommended for kids ages 8 and up, but you can easily change the dimensions for a smaller board, or even make this a one-step process by starting with an old skateboard and small roller!
If you’re digging this summer DIY, you might also like making our upcycled flameless camp lanterns or heading outside for our collection of over 100 fun-in-the-sun summer play activities and water games that don’t waste water.
Note: We prefer to shop locally or use what we have at home, but this list contains Woodpeckers Crafts, Etsy, Blick Art Materials, Bookshop.org and/or Amazon affiliate links for reference. As affiliates (and Amazon Associates), we make a small commission on qualifying purchases.*
BASIC SUPPLIES:
OPTIONAL SUPPLIES:
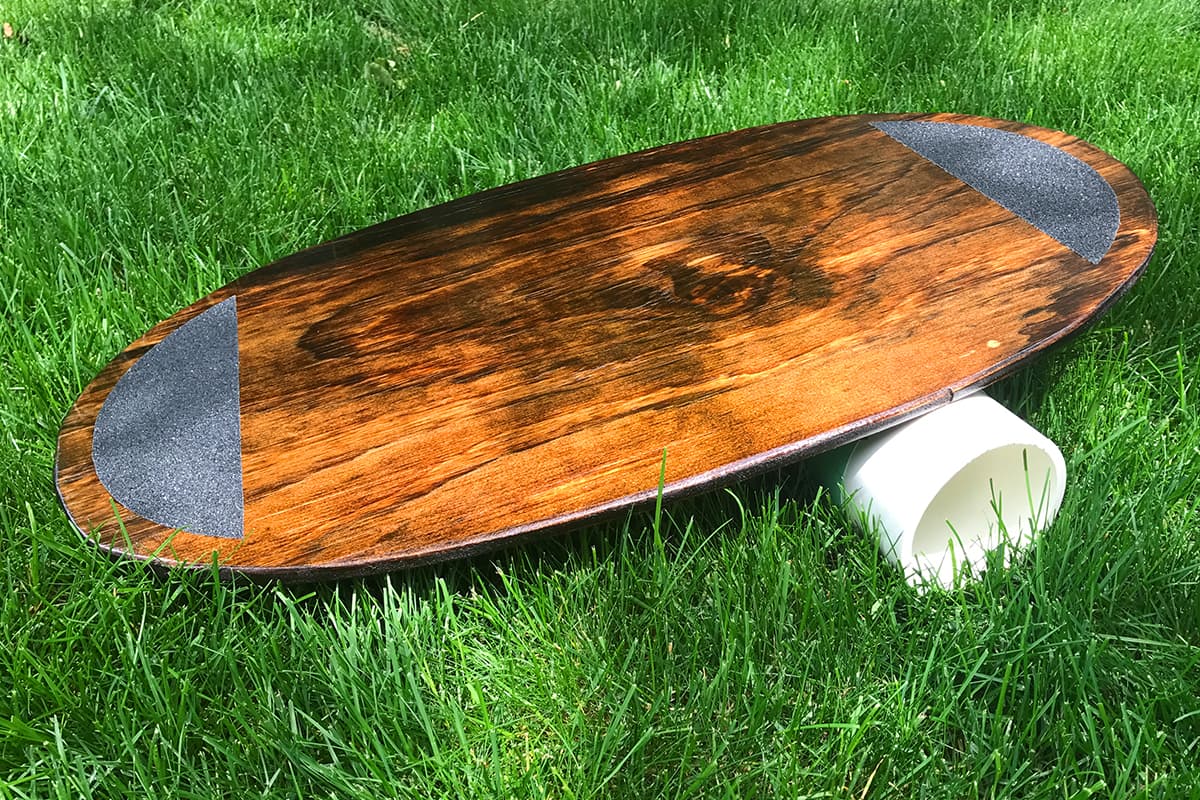
Learn how to make a simple DIY balance board from scrap wood!

Find a suitable piece of scrap plywood – 3/4″ hardwood plywood works best if this board is for the whole family, as it can easily and safely hold the weight of an adult.
If you don’t have a piece at home, head to the store for a piece of 2-foot by 4-foot 3/4-inch plywood.
You can print out our optional template and prep it by taping the sheets together to create the full-sized outline, or skip it if you don’t have a jigsaw or don’t want rounded edges – a straight-sided board will work too!
*Note: One of my favorite wood shopping tips: if you don’t have wood cutting tools at home, most big box stores or lumber shops will cut a piece to size for you if you ask.

Place your template on the plywood and trace around it with a permanent marker.
Grab your safety goggles and fire up the jigsaw! Clamp your plywood board to a sturdy working surface and cut along the outline (or your desired shape).

For added stability, I put small bumpers on the bottom of my board. These bumpers only allow the roller to roll to the edges of the board and no further – stopping it from sliding out from underneath the board. This way, when you’re rolling back and forth on your roller, it will hit the bumpers rather than from flying out from under your if you slide too quickly from one side to the other.
You can use scrap from the ply you cut away for two long blocks that will create simple bumpers. Mine measured 8″ long by 1.5″ wide.

Sand, sand, and sand some more! Starting with coarse-grit sandpaper, thoroughly sand the top, bottom, and all around the edges. Sand again with medium grit, then again with fine grit.
I used a palm-sized power sander to speed the process up, but you don’t have to! If you have a small spare wood block, you can wrap sandpaper around it to make sanding a little easier.
After sanding, wipe down your board and bumpers with a damp rag or tack cloth.

If you want to stain your board, this is the time to do it! Apply a wood stain (if desired) to the board and bumpers and let dry for a solid 5-6 hours in a well-ventilated, dry area. Apply additional coats for a darker color (I applied two).

I highly recommend doing 2-3 coats of polyurethane with sanding in between – mostly because I like to use my board with bare feet for better stability, and a few extra coats of a nice thick finish means zero chance of a surprise splinter. Splinter-free is the way to be.
I did 2 coats of clear gloss, painted my stripes on just with some leftover paint I had, and then applied one more on top, to seal in the stripes and give it a glossy, super-smooth finish!
*Note: You’ll want to let dry for at least 8 hours between coats – if it’s still tacky, it’s not dry. Once you’ve put your last coat of poly on, you’re going to be dying to test this thing out – resist! Make sure you give your board a solid 24-48 hours of dry time before you hop on – take it from me…sticky feet are a real bummer.

Attach your bumpers using two screws at opposite ends for each bumper. I started my screws through the top of the board, but only because I knew I was going to be covering them with grip tape. If you’re not, start the screws through the bumpers, making sure they don’t go all the way through the top of your board.
As you can see, I actually attached my bumpers BEFORE staining, and although it doesn’t really make a big difference, it’s technically not the most detailed or thorough way to do it. Personally, I say do it in whichever order you prefer.
*Note: Keep in mind that the closer to the middle of the board your bumpers are, the less room you have to roll – for younger boarders who might just be learning balance, bumpers a bit closer together can be a great way to ease them into balance training.

I added grip strips at the edges, and although it’s optional, I recommend it! I wanted to make sure I had something at the edges to keep my feed from sliding, and have been thankful everytime I get on it that they’re there.
I included the grip tape shape I cut out in the template, but you can just cut strips from a roll if you’d rather keep it simple! For younger kids, you may want strips going horizontally the full length of the board (these help immensely if you or your kids like to wear socks while boarding).
*Note: I purchased my grip tape at Home Depot (it was actually meant for stairs) but if you’re having trouble finding it, there are tons of places to purchase it online – I even found a bunch of sites that sold cool colors and patterns like these or these.

For the roller, you can either use a foam roller (I use a 6″ diameter, 18″ long roller) or purchase a piece of 3″ PVC pipe from a local supplier or box store (they’ll cut it for you). Wrap a few pieces of duct or grip tape around the pipe for added stability.
*For the original-sized board, trim pipe to 18″ and for a smaller kid-sized board, a 2-inch pipe trimmed to 12″ works well.

Add fun stuff, decorate, and make it your own!! You or your kids can add decals, stickers, stripes, or even paint their own designs
And that’s it!! I am SO ready for a quick lawn-surfing sesh! For kids especially, starting on a lawn, carpet or rug is the best way to go! You may also want to have something for them to grab and hold onto for stability as they start learning (a chair, railing, wall, etc).
It is super fun to watch kids figure this out – and almost impossible not to hop on as soon as they’re done to try it out yourself!

Curious to see how these actually work?? Check out this young boarder multi-tasking!!!
And 10-year-old Bowie has already put together a full workout on her balance board!
And this 4-year-old has it totally figured out…
*A note about affiliate links: We strive to use simple, earth-friendly supplies that can be purchased locally whenever we can, but sometimes we find the best universally available options, a rare eco-friendly find, or a niche product only available on Blick Art Materials, Amazon, Etsy, or Woodpeckers Crafts. When included in our supply list, these products are affiliate links, and if you click through to make a purchase we receive a small commission that helps us re-order these supplies!
SaveSave
GETTING READY TO TRY this?
I love seeing all the ways people make these ideas their own! If you're sharing the results of one of our projects, mention or tag me with @barleyandbirch, or share it in the comments of one of our Pinterest project pins.

Comments are closed.


Hi, what colours do brand of wood stain did you use? X
Sorry, my comment got messy. I meant what colour and brand of wood stain you used
Oh no problem! I believe it was Minwax in the “Honey” color. The more coats you put on, the deeper and darker the color gets, so you can stop staining whenever you’ve achieved the color you prefer (I used two coats).
Where can i download the template or what do i have to do to get it? thx
Hi there! The link to our free template is up in the supply list – (visit https://barleyandbirch.com/shop/diy-balance-board-template/).
I made this and it came out amazing!! Not only was it a super fun result but I was able to learn along the way. Thanks so much for posting this I am obsessed with my board. For the decorative part I did my own collage so making it myself ended up much prettier and cooler than the ones you can buy online. 11/10 reccommend
AHHH! Amanda, that’s awesome!! So glad to hear the instructions worked well for you, and I feel exactly the same – knowing I made mine myself makes it so much more enjoyable. Many many thanks for the SOLID recommendation and congrats on DIYing it!
How thick is the plywood? It appears to be around 3/4″. Is that correct?
Thank you SO much. Turned out great. First use was learning and falling off. Second use I managed to wake up with sore thighs next day -yay! Things have now smoothed out and it is great part of fitness and staying “right” when I can’t get in water. NOTE that I would recommend a stick or similar while learning. Can catch balance without falling off.
Tony! Congrats on your new board, I’m so happy you DIY’d it and it’s working out so well! Cheers to sore thighs (that’s how you know it’s working, right?!) and great point on the stick prop recommendation – it takes a while to get used to the wobble for sure.
So nice! This is a good work!
I’m having issues accessing the template. I put a price in, click add it to my cart and it then says my cart is empty? Can you email it to me directly?
Hey Devon, thanks for letting me know! I’ve emailed the template over and will check to see what could be happening with the cart. Have fun boarding!