

The iconic image of Dr. Martin Luther King, Jr. leading the March on Washington for Jobs & Freedom – hopeful people as far as the eye can see – is one that’s so familiar, but never fails to inspire.

Using simple shapes, I recreated the image in collage form for a Martin Luther King Jr. kids’ art project you can use for discussion (as well as a bit of art theory). The simple repeated forms layered on paper give kids a hands-on way to explore visual perspective.
But more importantly, this project creates an opportunity for adults to explain the historical perspective – what this captured image represents, a more complete history of MLK’s teachings, and invite discussion about how this moment in time relates to current events.

BASIC SUPPLIES:
OPTIONAL SUPPLIES:


There are quite a few ways to make this collage your own. For the most part, this is made with simple shapes you can easily eyeball to cut out and recreate.
We made a free template including the incredible Dr. Martin Luther King, Jr. himself (and each of the shapes to scale) in case you’d like to keep this simple – but I think it could also be constructive to have kids draw MLK, Jr., individual faces on their “crowd” cutout circles, or incorporate actual photographs in the collage.
Once you have all of your collage pieces cut out, you can follow the pictures below to see how we layered the pieces to re-create the iconic “I Have A Dream” speech image.
Tip: Feeling like all these cutout shapes are going to mean A LOT of prep work for you? Instead of cutting out the small circles for the faces in the crowd, you can invite kids to draw them right on the paper, or make the faces from fingerprints instead!

Start by laying down the background (the sky, the Washington Monument, and the reflecting pool).
Once the placement looks good to you, use a glue stick to glue your shapes down.

This is a great lesson in perspective for kids. For reference, you can print out and refer to the actual photo at the top of the post to help them recreate the line of trees in perspective.
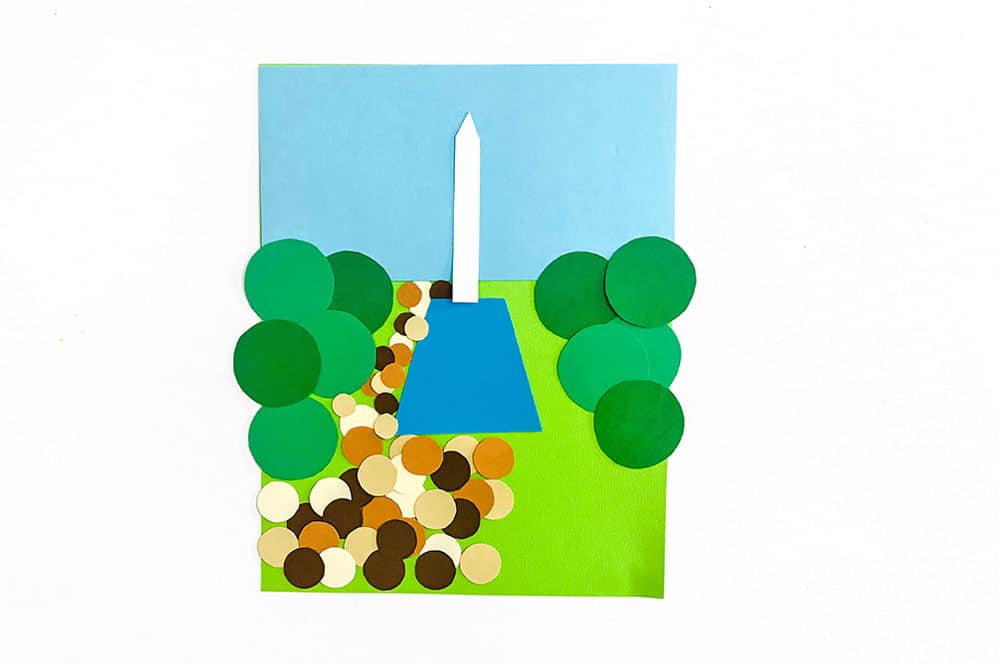
Begin adding the crowd. To create the crowd I used 2 sizes of circles, but you can use more or less. There’s another little mini-lesson in perspective here too, in that, the farther away something is, the smaller it will be. Small circles will go toward the back, and larger circles will be at the front.

Add Dr. Martin Luther King, Jr. – you can use the one from our free PDF template, cut out a printed picture, or draw your own!
Use scissors to trim any of the excess paper around the edges of the collage.
One of the things I like about this project is the opportunity to build upon the visual aspect, using it as a tool for reflection, dialogue, and deeper understanding. Here are just a handful of ideas to help you use this activity to explore visual, emotional, and historical perspectives…
1. Foreground vs. Background:
Discuss how elements closer to the viewer (like MLK’s cutout or people in the crowd near the front) appear larger, while those farther away (like people in the distant crowd or the Washington Monument) appear smaller, helping kids understand depth and scale in art.
2. Overlapping Layers:
Show how overlapping paper pieces (like the Lincoln Memorial Reflecting Pool partially behind MLK or trees behind the crowd) create a sense of spatial hierarchy and perspective.
1. Imagining the Moment:
Ask kids to close their eyes and imagine the sounds, feelings, and energy of the day. You can play a recording of MLKs speech, and If the weather permits, head outside! What would it feel like to be in a huge crowd listening? Add context by describing the weather and atmosphere the people there experienced that day.
2. Empathy Through Art:
Start a dialogue about how people in the crowd might have felt—hopeful, determined, nervous, or even fearful of backlash. How do you think you would have felt standing in the crowd?
3. MLK’s Viewpoint:
What would MLK have seen as he gave his speech and what might feelings might he have experienced, looking out at the crowd? This exercise can lead to discussions about leadership, courage, and the emotional weight of speaking out for justice.
1. Then vs. Now:
Discuss the ways racial equality, justice, and activism have or have not evolved since MLK’s speech in 1963, inviting kids to include symbols of both past and present in their collage (for example, signs representing the Civil Rights Movement alongside modern-day slogans).
Rather than being a stand-alone art activity, this is intended to be paired with discussion. If you’re looking for ways to begin the conversation here are a few ideas for places to start…
While we’re here, I’ll take a minute to share Bob Adelman too, the freelance photographer who captured this moment with incredible skill. “I shot with one eye on the lens, one eye on history, and my heart was with the movement”. You can find a whole collection of his civil rights photography here.
Working with younger kids?
This project may be a bit advanced for little ones still learning how to use scissors. You can skip the sharp-edged tools and cut all the pieces out for them to arrange, or invite them to use watercolors to make a set of their own diverse peg dolls they can set up as a 3D representation instead, for a project that encourages education, inclusion, and acceptance.
Visit our Black History Month resource collection for links to even more educational resources to help you continue learning and teaching throughout the rest of the year.
GETTING READY TO TRY this?
I love seeing all the ways people make these ideas their own! If you're sharing the results of one of our projects, mention or tag me with @barleyandbirch, or share it in the comments of one of our Pinterest project pins.

Comments are closed.



WOW this art project is absolutely magnificent in memory of Dr. MLK and this historic day. Thank you so much for sharing this inspiring collage idea.
So glad you enjoy the idea, and thanks for visiting!
we are so excited to do this this week as we learn about Martin Luther King Jr, thank you so much for sharing your idea and your templates! hope it is ok that we shared it on our blog for anyone who saw us do it and would like to try it out as well!
Hi Myranda, I’m so glad you found it and hope you had a lot of fun making your collage! You’re more than welcome to share!