

Fall Activities for Kids . Nature-Based Play . Small World Play . Spring Activities for Kids . Summer Activities for Kids . Winter Activities for Kids . Wood Projects for Kids
Make DIY Woodland Fairy Peg Dolls

Amanda Eldridge
Fill a tiny forest with your own enchanting set of DIY woodland fairy peg dolls for creative small-world play. With a kid-friendly crafting process that encourages creative reuse and imaginative storytelling, this activity will surely be a hit with fairy lovers of all ages, from start to finish!
Spring came late this year, but it arrived with an astonishing surprise. Back behind our shed, among a group of tall pines, a frolic of fairies has taken up residence.
Use the links below to jump straight to a specific topic of interest in this article…

We’ve been exchanging (very) small notes, and they’ve indicated they’ll be with us through October, watching over the woods and waterways surrounding the neighborhood.
Press play for a magical glimpse of our fairy peg dolls in the garden…
Through our correspondence, this tightly-knit fairy family has shared quite a bit about themselves, so now *I* get to introduce them to you and post a few of the family portraits they’ve left for me (with their approval)…

Up first are the wildflower fairies – Anemone, Hepatica, and Primrose. They’ve been working hard lately, convincing the woodland flowers to pop out of the nice cozy dirt, stretch their leggy stems, and bloom. They spend the summer flinging wild seeds into the wind, directing pollinator traffic, and generally tending to their wild gardens.

Next, meet Sequoia, the wood sprite, Cedar Wing, the pinecone pixie, Hornwort, our fairy of the moss, fungi, & lichen, and Hawthorn, the leaf sprite. These four work together, cultivating and sustaining the woodland growth – from the forest floor to the tip-top of the highest tree!

And now we’ve come to our smallest fairy visitors – but don’t let their size fool you…these two may have the most important jobs of all. Often found gathering nuts, berries, and seeds from the hedges and brush, Bramble is a fairy of the thicket who ensures the woodland wildlife has an abundant supply of food.
And last but not least, Dewdrop, our water nymph, watches over the lakes, streams, and even the puddles. These two love making a little mischief, and a stroll through your backyard in the early morning will give you an idea of their late-night shenanigans…dew and scattered seeds and pollen dust everywhere!

For more charming fairy activities, flit over to the tutorials for our fairy greenhouse seed starters, cardboard toadstool gnome home (that doubles as a fairy nightlight!), or artfully autumnal magic wand. Or download our fairy scavenger hunts for imaginative outdoor playtime!
Note: We prefer to shop locally or use what we have at home, but this list contains Woodpeckers Crafts, Etsy, Blick Art Materials, Bookshop.org and/or Amazon affiliate links for reference. As affiliates (and Amazon Associates), we make a small commission on qualifying purchases.*
BASIC SUPPLIES:
OPTIONAL:
Safety note: Making these for a household where there are kids under 5? We recommend leaving the faux flower bits off and sticking to fairy wings and felt hats. Also, be sure to use super glue (like gorilla glue) or something equally as strong to hold on the wings.

Use our step-by-step tutorial to make your own set of charming woodland fairy peg dolls, perfect for imaginative play or as a decorative addition to any nature-inspired theme.

We started by painting our fairy peg dolls different skin tones with watercolors (as shown in the tutorial for our diverse DIY peg dolls). It only takes about 5 minutes to be dry to the touch, so you can quickly move on to painting the rest of the peg doll.
We painted the bodies of our peg dolls with acrylic paints. Our particular color palette was inspired by colors we’ve observed in the woodlands, but you can choose your very own favorite forest shades.
I wanted our fairy peg dolls to be extra durable and have a nice shine, so I added a coat of Mod Podge. I used Mod Podge specifically because it fully dries in about fifteen minutes, but you can use any finish if you prefer!
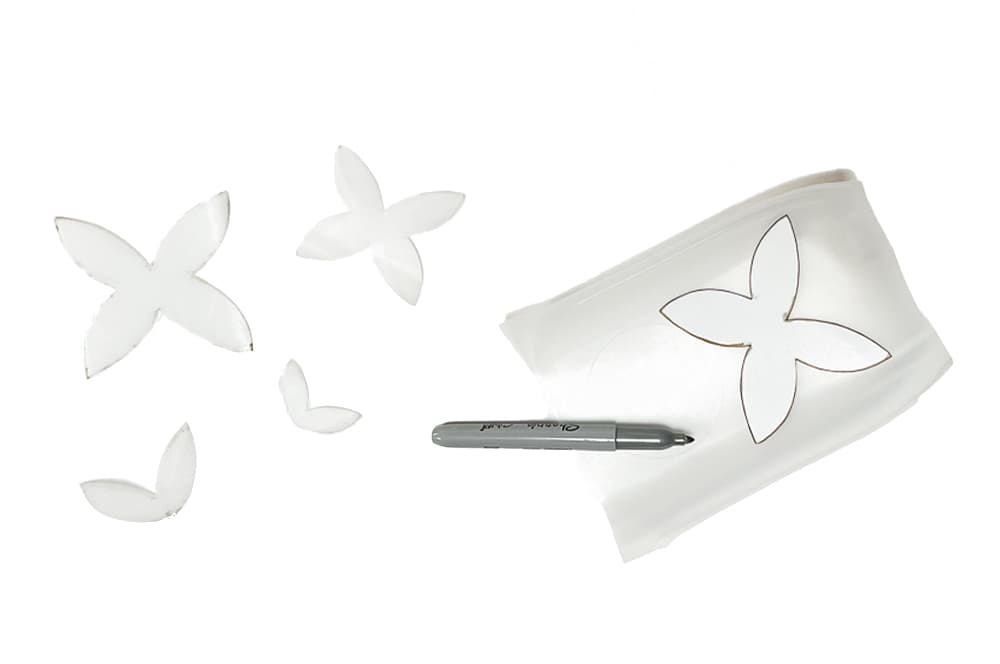
I looked FOREVER for the perfect recycled supply for our fairy wings. I wanted something translucent that could hold its shape and wouldn’t have sharp edges when cut. As it turns out, a plastic water or milk jug (I used the gallon size to cut all my sets of wings) is just the thing! Start by cutting apart your water jug on each side.
Using our free printable fairy wing templates (or your own hand-drawn wings), trace a set of wings onto one of your water jug pieces. I used a permanent marker, then cleaned the edges with a bit of nail polish remover afterward to erase any leftover pen marks. Cut out your fairy wings with scissors.

When I picture fairy wings, I imagine them to have a pearly shimmer – much like dragonfly wings. Though I kept most of our wings plain for simplicity’s sake, I had some leftover cellophane from a gift and thought I’d experiment with it. I glued a square to a pair of butterfly wings with a glue stick, let it dry, then trimmed around the wings.
Though it looks FANTASTIC, it was a bit fussy, and instead of trying to work with the cellophane, I’m going to try painting them with some iridescent nail polish next time – a much easier process for kids (and you!).
Using our fairy hat templates (or drawing your own simple quarter-circle shapes), trace and cut out the pieces for your felt fairy hats. Roll into a cone, and glue along the edge with a hot glue gun.
We added decoration with small clippings from old faux flowers, leaves, and greenery to give our woodland fairies their own style and flair. This is a fabulous way to recycle those dusty old faux flowers (something you can almost ALWAYS find at thrift stores or grab for free from a neighborhood marketplace).
The last step is to add the hats (or other headwear) onto your peg dolls – using one small dot of hot glue at the back and front of each hat. We decided it would be more interesting if some of our peg dolls had creative variations on hats, and found that an upside-down plastic faux bloom, acorn, and pair of little wired faux stamens make the cutest fairy chapeaux!
These little fairies would be right at home in our miniature peace gardens or fairy forests.
Our set of handmade fairies was created as an outdoor play tool to encourage creative nature exploration. Here are some ideas to inspire you to use them in fun and unique ways…
I took extra care to make a set of durable fairy dolls that could be used outside and withstand a rinsing if needed, so these fairies can be placed just about anywhere in the backyard, which makes them perfect for a little fairy scavenger hunt! Hide them under bushes, behind a flower pot, or even in the branches of a tree.
Especially for little ones who may not be thrilled at the prospect of outdoor playtime, have a fear of backyard wildlife, or get bored with independent small-world play, this little game is a great distraction from their dislikes/fears/boredom.
For a simple creative play exercise, you can grab a couple of pixie peg dolls and a simple prop or two (pinecones and leaves, a miniature toy, etc.) and invite your kiddo to start a story. Need a prompt? You can use our fairy stories and names as a springboard.
Building a woodland fairy habitat is one of those sensory or STEAM-centered play activities that is great for an afternoon in the yard OR a rainy day inside. You can use recycled supplies, cardboard boxes, a flower pot, or nature finds to build a woodland-inspired home, fairy garden, or forest habitat for your peg doll fairy family. Our fairy forests are a lovely example of simple habitat-building.


For proper fairy-making ambiance, fire up our kid-friendly fairy glade playlist and grab more ideas for tiny accessories and play ideas from our small world play archive.

*A note about affiliate links: We strive to use simple, earth-friendly supplies that can be purchased locally whenever we can, but sometimes we find the best universally available options, a rare eco-friendly find, or a niche product only available on Blick Art Materials, Amazon, Etsy, or Woodpeckers Crafts. When included in our supply list, these products are affiliate links, and if you click through to make a purchase we receive a small commission that helps us re-order these supplies!
GETTING READY TO TRY this?
I love seeing all the ways people make these ideas their own! If you're sharing the results of one of our projects, mention or tag me with @barleyandbirch, or share it in the comments of one of our Pinterest project pins.

Comments are closed.



I am emailing from Ellingham Primary VC School PTA in Norfolk (charity number: 1044166).
I am trying to source some donations for our forest school offerings. As I’m sure you are aware, with school budgets falling and items costing so much more we are trying to source donations of required items where possible so our children get the most from these sessions.
Our forest school leaders takes classes for sessions outside (rain, shine or snow) and they build dens, use tools, make fires, make hedgehog and big houses , learn about trees , animals and biodiversity alongside planting vegetables in our gardens. With a world that is so technology based, as parents we love the kids being out and about and just being ‘kids’. My daughter loves forest school and everything it has to offer and a brilliant addition to our little school.
Our forest school leader had requested we try and source some fairies and dragons/small world wooden items. Is this something you can help with?
If you can help the delivery address is;
1 sheepwalk cottages
School road
Kirby cane
Bungay
Norfolk
NR352HL
Thankyou so much for taking the time to read my email and hope to hear from you soon.