

Double, double, toil, and trouble…bubble, sparkle, fizz, and blob! Set up your own paint potions mini art lab with basic household ingredients, then make your own 2D potion compositions with this project that packs a mad process art punch!
A mad scientist has been let loose in the art room, and the results are too captivating to keep to ourselves! We’re passing along the secrets of our magic paint potions lab – a hands-on art and science activity that allows your little testers to experiment with simple and safe chemical reactions while creating colorful art!
Use the links below to jump straight to a specific topic of interest in this article…
I consider our paint potion lab a two-part project, but you can stick to part one, try both pieces, or come up with your own clever variations. Once you begin playing with the possibilities, it’s *truly* difficult to stop.

Part one is about encouraging kids to experiment with the different supplies to create their own magic paint “potions.” This is the open-ended half of the activity that focuses on the process rather than the product.
Press play on the video to see our paint potions in action…
Music by Mona Wonderlick / Download it here
Part two is a great way to expand on the project (especially for older kids) and present an invitation for children to design their own paper potion bottles (using the painted papers from step one) and put together a two-dimensional potion composition.

For the little wild wizards in your life who love pouring, mixing, and following their curiosity, this art-themed science invitation will surely be a hit. And even though it’s ideally suited to October and Halloween, it is outrageously entertaining whatever the season.
Looking for more kids’ process art ideas to try out? Our artist-inspired Halloween blind drawings, process art play tiles, and scrap wood sculptures are wonderful projects to explore!
Note: We prefer to shop locally or use what we have at home, but this list contains Woodpeckers Crafts, Etsy, Blick Art Materials, Bookshop.org and/or Amazon affiliate links for reference. As affiliates (and Amazon Associates), we make a small commission on qualifying purchases.*
BASIC SUPPLIES:
OPTIONAL SUPPLIES:
BUBBLE PAINTING SUPPLIES:
SPARKLE PAINTING SUPPLIES:
FIZZ PAINTING SUPPLIES:
BLOB PAINTING SUPPLIES:
$1.99
An 8-page PDF set optimized for black & white printing.

add this printable too…
$1.99
A 3-page PDF set optimized for black & white printing.


Use our easy step-by-step guide to learn how to create a paint potions process art lab that engages and inspires kids to experiment with new supplies, unique painting processes, color-mixing, and more.
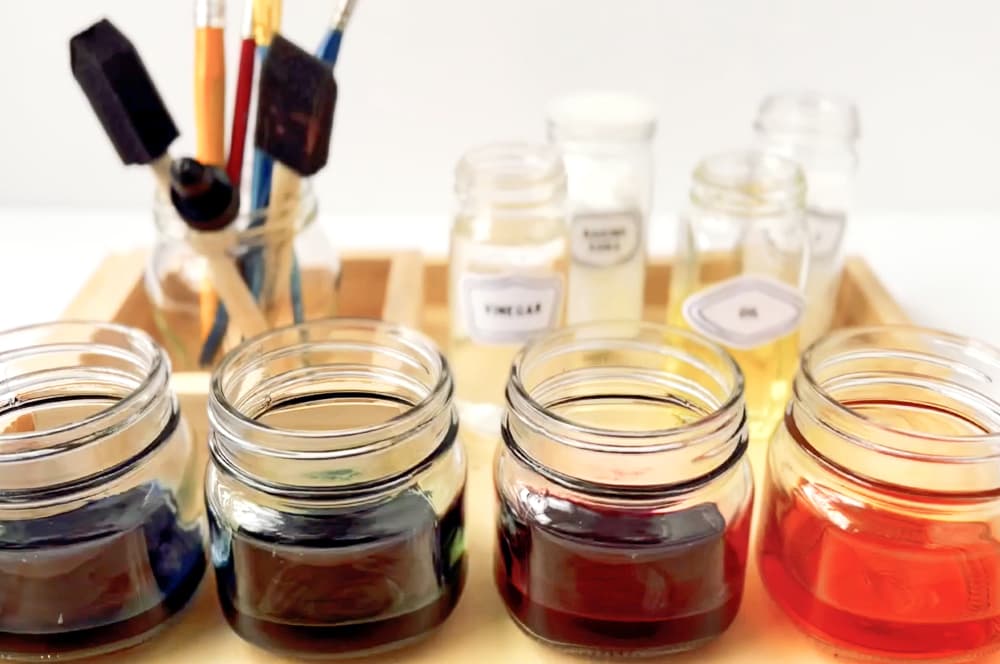
Gather your potion supplies and set them up on a tray, tabletop, or dedicated area.
In my opinion, a potions lab is really the MOST fun when everyone can go a little crazy and embrace the messiness of it, so make sure you’re working in an area you can easily clean up afterward.
If you still have nice weather, this is a fun one to take outside!
Grab another tray, an old cookie sheet, or something similar with low sides.
Tip: If you have it, a tray with a bit of a lip will help to catch any drips or fizz, salt sprinkles, or other potion ingredients that may stray beyond the paper, so you can whisk everything right into the sink when finished.

I’ve demonstrated four basic paint potions for you – you can watch the process video above, scroll down to see the paint potion recipes we used, OR come up with your own (I’ve added a fifth recipe for a color-changing potion too!).
You can also try mixing more than one of the potions together or try them ALL on the same piece of paper. How do the reactions change?
Add empty bowls or bottles to your lab space so ingredients can be mixed together before they hit the paper. What happens?

You’ll want to let your potion papers dry completely before moving on to part two of our potion art project – the 2D potion collages. This is a great way to turn your experiments into artwork and makes a nice complimentary project for a second day of potion art play.
Draw a potion bottle shape, or use one of our potion bottle templates to trace the shape of a bottle onto your (fully dry) artwork. Cut out your potion bottle.
Tip: instead of tracing onto the painted side as we did, you can flip the art over and trace onto the blank side, making it easier to draw and see a clear outline.
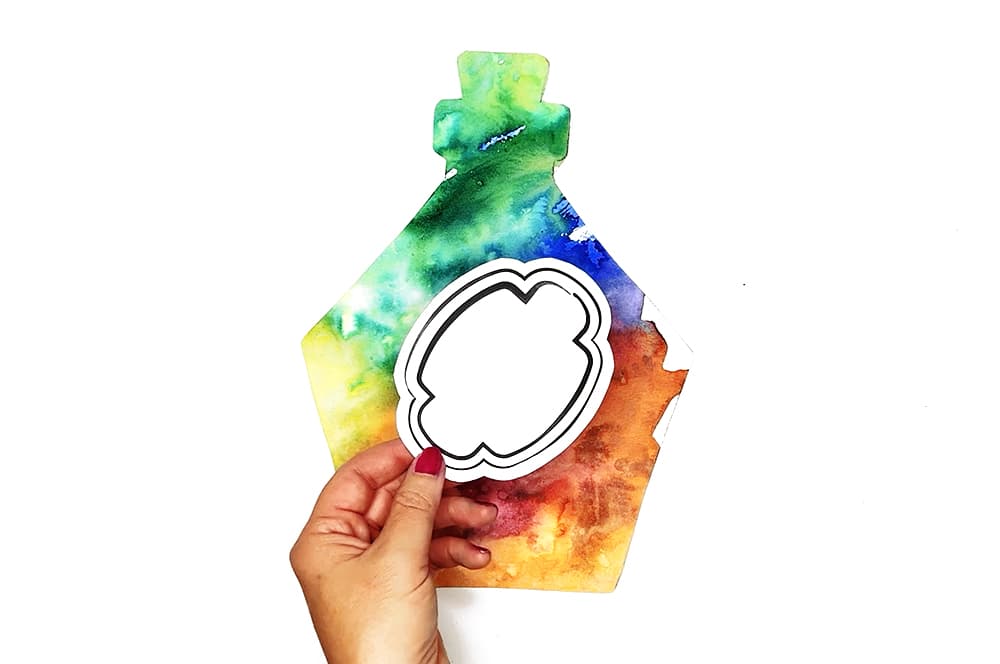
No magic potion would be complete without a fun name and cool label – come up with a great name or description for your potion and paste it onto your potion bottle art with a glue stick.
You can use our potion label templates or draw/cut out your own label shapes.
Once finished, you can arrange your potion bottles on a piece of paper, then use a glue stick to glue your composition down.
Fill the shelves of a paper lab, or show your potions bubbling and exploding. Draw a mad scientist at work or someone’s (or something’s!) reaction to one of your magic potions.
We’ve done it again, Igor! The ultimate art experiment….mwuhahahaha!
Ready for the recipes to make your own potions? Each uses one everyday household supply (plus a bit of science), so gather them up and prepare to experiment, dazzle, and delight with your painting wizardry…

Baking soda and vinegar are often used to demonstrate erupting volcanos (or fizzing pumpkins, this time of year), but you can get the same reaction on paper and turn it into art!
The fizziness of this potion is caused by a chemical reaction between baking soda (sodium bicarbonate) and vinegar (an acetic acid). When the liquid vinegar hits the solid baking soda, they neutralize each other and produce a carbon dioxide gas, creating the bubbles of the foaming mixture.

The blob painting potion and process is my personal favorite! Begin by drizzling oil onto your paper. Paint over the paper and oil with watercolors for an AMAZING effect…!
To understand how this potion works, it’s important to know that oil and water have different densities and different charges. The water molecules are packed so densely the oil can’t break through them.
In addition, oil doesn’t have any polar molecules they’d need to break some of water’s hydrogen bonds. Polar molecules only dissolve in polar solvents. The oil can’t dissolve in the water (a polar solvent), so the oil is forced to stay separate from the water.

Salt is the secret to our sparkle painting potion. Typically, artists brush watercolors onto paper first and then sprinkle them with salt for a fun effect, but our potions lab is all about breaking the rules!
Try sprinkling salt on the paper and using an eyedropper to add watercolors over top. What happens?
We used table salt and ice cream salt for our sparkle paintings – experiment with any types you have around the house. Our ice cream salt left shimmery, iridescent outlines when we let it sit with the watercolors for a while, which was a fascinating discovery!
This potion provides a little lesson in absorption. The salt sucks in all of the water but leaves the pigment behind, creating dense speckles of color but also lighter spots where the salt sits.

Mix about a tablespoon (or a few squeezes) of dish soap with a quarter cup of liquid watercolors or dyed water. Use a straw to blow into the mixture, creating big bubbles that come up over the edge of the bowl, cup, or jar. Quickly tap your paper to the top of the jar and pull back to see the cool effect the colored bubbles leave!
Though bubbles are temporary structures, we can capture prints of their forms using a little science! Bubbles form when water molecules stick together, creating surface tension – when color is added to the soap; the color binds to the water molecules.
Pop the bubble with the paper, leaving a print behind even after the water evaporates.
Consider this potion recipe extra credit. We didn’t include this in our own paint potions experiments because it requires a little extra preparation time, but it’s a reaction I’ve tried before and would work perfectly with your own potions lab. It’s also a fantastic bit of science magic!
Color-Changing Potion Instructions:
With your prep done, you can brush your cabbage water onto paper with a paintbrush, then add drops of vinegar with an eyedropper. Watch as the paint potion magically changes from purple to pale pink! For even more color-changing sorcery, try adding drops of lemon juice and baking soda, or add food coloring to the cabbage water before painting to create different color-change results.
This potion demonstrates an acid-base reaction. When you boil red cabbage, it releases a natural purple dye that can act as a pH indicator. The cabbage water changes color when it comes into contact with acids or bases.
The color change happens because the molecules in the cabbage dye react differently to acids and bases, and by observing the color shift, you’re actually seeing the result of an acid-base reaction.

So many readers have used our paint potions lab for an October or Halloween art invitation. For more art wizardry to try at home, try one of these Halloween-ish activities…
ALL of these ideas are wonderful to use with our free printable kids’ art challenge for an epic exploration of art mediums!
*A note about affiliate links: We strive to use simple, earth-friendly supplies that can be purchased locally whenever we can, but sometimes we find the best universally available options, a rare eco-friendly find, or a niche product only available on Blick Art Materials, Amazon, Etsy, or Woodpeckers Crafts. When included in our supply list, these products are affiliate links, and if you click through to make a purchase we receive a small commission that helps us re-order these supplies!
GETTING READY TO TRY this?
I love seeing all the ways people make these ideas their own! If you're sharing the results of one of our projects, mention or tag me with @barleyandbirch, or share it in the comments of one of our Pinterest project pins.

Comments are closed.



This is one of the most inviting, exciting, creative projects of the hundreds I have reviewed developed, filmed, and narrated by Amanda at her Barley and Birch Company!
It was great fun just reading through the process; viewing and following the easy step-by-step directions; seeing beautiful, professional-grade paintings as final projects; and having everything needed — and extras! — included in this online package.
I would love to have framed examples to hang on my walls.