

Nestled deep in the heart of Norway, cozily tucked away amongst forests of lush evergreens and majestic snow-capped mountains, you’ll find this charming little Fjord village.
Inspired by a family trip and their day of sightseeing in Bergen, these colorful squeezable houses stand up on their own to create a handmade miniature soft town playset chock full of whimsy and character.

Bean bags stuffed in the bottom of this softie set are the secret to keeping them upright, and if you’ve followed us for a while, you might recognize the technique from our DIY gnome softie tutorial. For this particularly special sewing project, I wanted to run my design ideas by a real pro – enter, my VSM (Very Smart Mom).
As expected, VSM took one look at the plan and said, “I love it, but we can do this better”. So she’s the one to thank for many of the genius modifications that help to ensure a smooth DIY process and better play experience. It must be noted that VSM also did all of the sewing work because, for some reason, sewing machines have it out for me.
Where would we be without our VSMs…!?

Although this set was sewn by an adult, you’ll notice that the design basically combines rectangles and triangles. That means young sewing enthusiasts of any age will be able to find a way to participate in this project.
From the simple triangle trees to the more complicated houses, don’t be afraid to let your kids experiment with the patterns and find their own sewing comfort level. And younger kids, or those not as into sewing, can paint the details that bring this village to life.
For a sewing project that’s great for beginners and easier for kids to make on their own, visit our artful DIY rainbow softies (they use a surprising supply)!
Note: We prefer to shop locally or use what we have at home, but this list contains Woodpeckers Crafts, Etsy, Blick Art Materials, Bookshop.org and/or Amazon affiliate links for reference. As affiliates (and Amazon Associates), we make a small commission on qualifying purchases.*
BASIC SUPPLIES:
OPTIONAL SUPPLIES:
IMPORTANT SAFETY NOTE: I’ve glued on the windows and doors for each of our houses to make this a project that kids can easily participate in, but if you’re gifting these to toddler-aged children or younger, be sure to sew all pieces onto the houses instead, embroider details rather than paint, and assess whether you will need to skip the addition of any small loose parts like buttons. We also recommend play be supervised by an adult, and seams checked regularly for any small openings or tears.

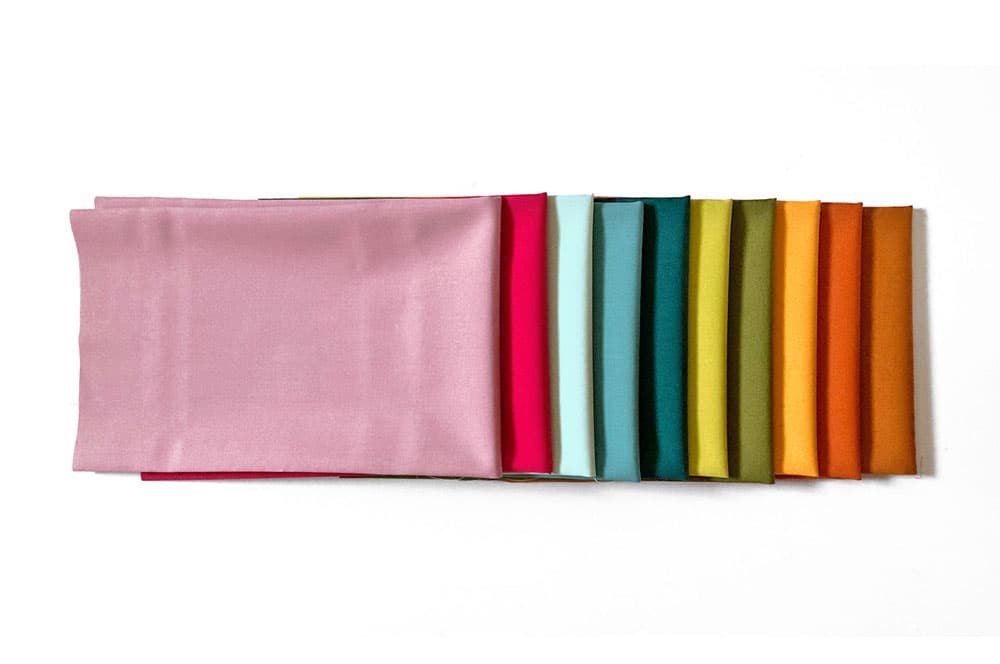
When putting this design together, I knew immediately that getting the fabric palette spot-on and determining how much I needed to buy would be a major key to this little village playset’s success. LUCKILY, I found this gorgeous set of fat quarter remnants I could build my design around.
Fat quarters are quarter yards of fabric that typically measure 18 by 22 Inches – cut to be wider than standard quarter yards. If you have quite a bit of fabric, you may find everything you need for this project by using leftovers. I didn’t have cotton scraps that fit the bill, so finding this bundle of fat quarters made life much easier!
There are enough different colors of fabric used in this playset that I included a fabric measurement guide in our printable village playset pattern. It shows how I laid out all of my patterns to fit on each fat quarter and includes the dimensions of each color of fabric I used so you can easily alter the pattern to work with scraps you might already have (or buy precisely what you need).
Once you’ve picked out your fabrics, iron them or throw them in your dryer on the steam cycle before sitting down to sew.
Download, print, and cut out our soft village playset printable PDF patterns. We’re basically sewing rectangles and triangles here, so for those of you who are comfortable with sewing, you may very well be able to eyeball our photos and use them for inspiration.

Pin and cut out the house pattern pieces to the corresponding fabric you’d like to use.
My VSM is a pinner, while I prefer to trace the pattern pieces onto fabric using a fabric pencil. If you also like to trace, Clover makes great water-soluble pencils you can use that I’ve linked to in the supply list.
Tip: If kids are helping with cutting or sewing these pieces, you can use safety pins instead of straight pins to help avoid any unexpected pinpricks.
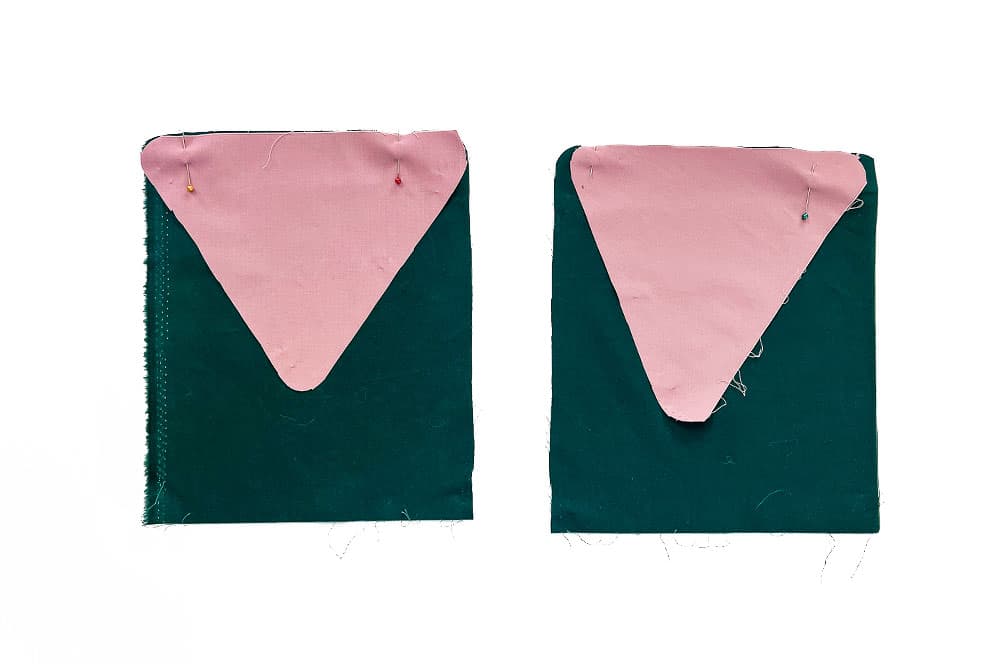
With the “right” or “nice” sides facing inward, pin the roof piece to the top of the main house facade piece. Sew straight across to join the bottom of the roof to the top of the building. Do this for both the front and back pieces.
This is where I should mention that our village was sewn together by a sewing machine to speed up the process a bit, but if you’re more of a hand stitcher or your kids are sewing these pieces, everything can absolutely be hand-sewn instead.

Stacking right sides facing each other again, pin the front and back of your houses together, then sew from the bottom left side all the way around to the bottom right side. Be sure to leave the bottom open so you can add stuffing!
Tip from the VSM: If you’d like a nice finished edge, you can iron the seams open after you’ve finished sewing.
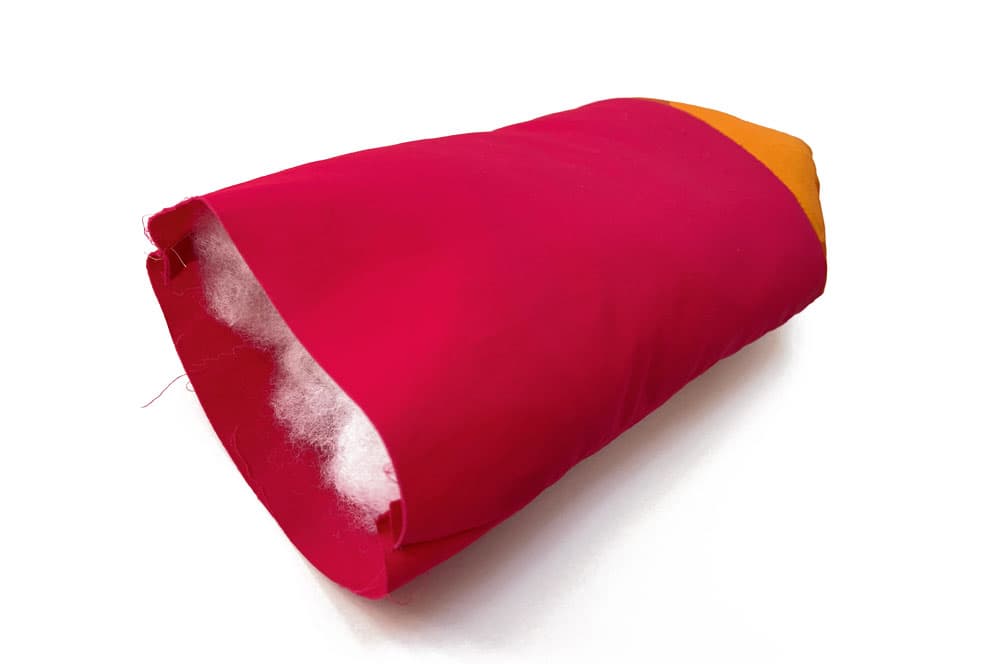
Once you’ve sewn your two house pieces together, flip it inside out so you have your “nice” side out – it’s time to stuff! Gently push polypill (or similar) into each of your houses, making sure to push all the way up into the top and corners.
Fill until fairly firm, stopping before it gets so plump that it starts to make your house more round than rectangular.

Next, we’re going to fill a small plastic baguette with dry beans. This acts as a weight and also helps to keep all the pieces of our village standing upright. Fill a small (we used 3-inch by 5-inch) resealable clear plastic bag with beans, pressing all the air out before closing. Seal and stuff into the bottom of each house.
A big benefit of bagging our beans? Once sewn in, there’s no chance a stray bean will fall out, making these safer for toddlers to play with and also (relatively) water-safe should you ever need to clean the outside off with a damp sponge.
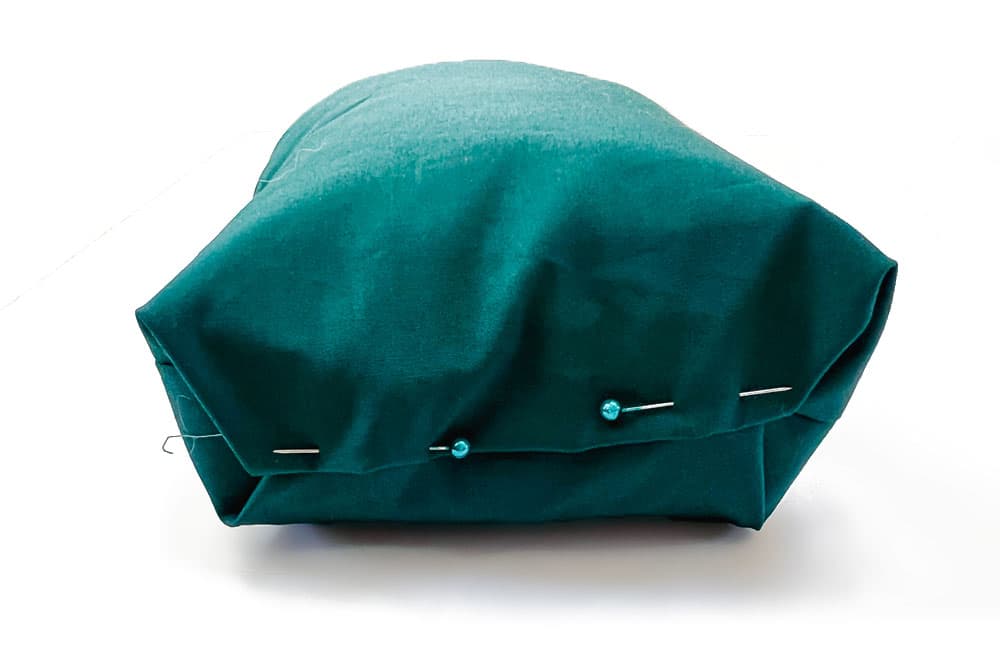
Fold up the bottom similar to the way you’d wrap a package, pulling both end corners toward the center and folding the long edges inward. Pin together, then sew across the bottom.
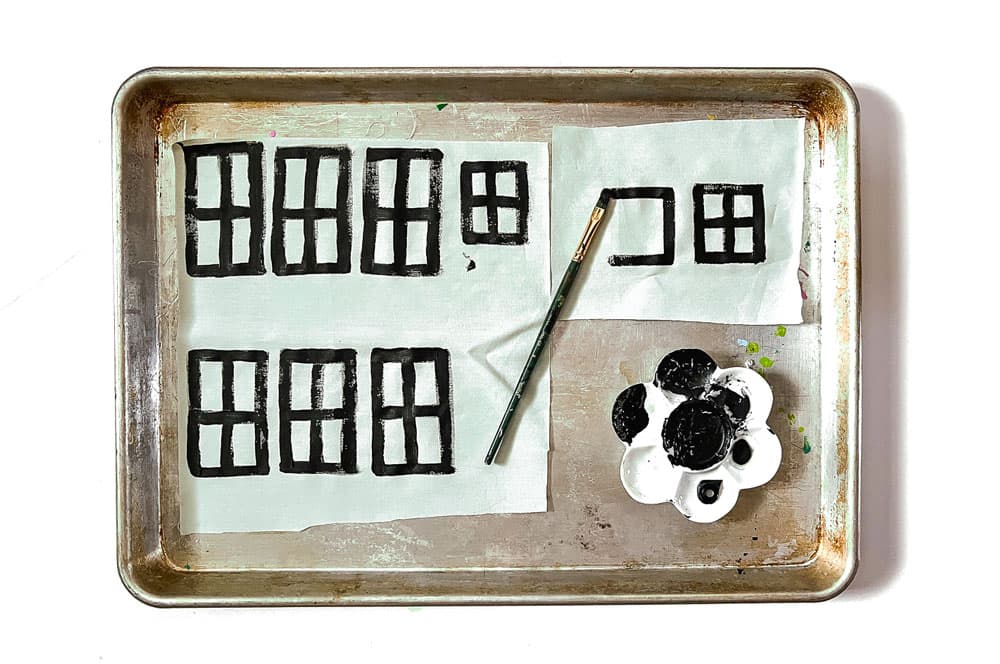
Using fabric paint (or acrylic paint mixed with a painting textile medium) paint windows onto cotton fabric. This is a great chance to involve kids who can come up with their own designs or paint fun details into the windows and doorways. If trying this step with kids, I recommend taping down the fabric at each corner so it doesn’t move around as they paint.
I like to work on an old cookie sheet – the slight lip keeps things from being bumped around, they’re easy to clean, and should you need to move workspaces mid-project you can just pick the whole thing up.
Instead of painting our doors, we cut them out of patterned fabric to add a bit of repeated texture, but you can choose whichever process you prefer.
You can trace the window and door patterns included in our printable, or just free paint your own sets!
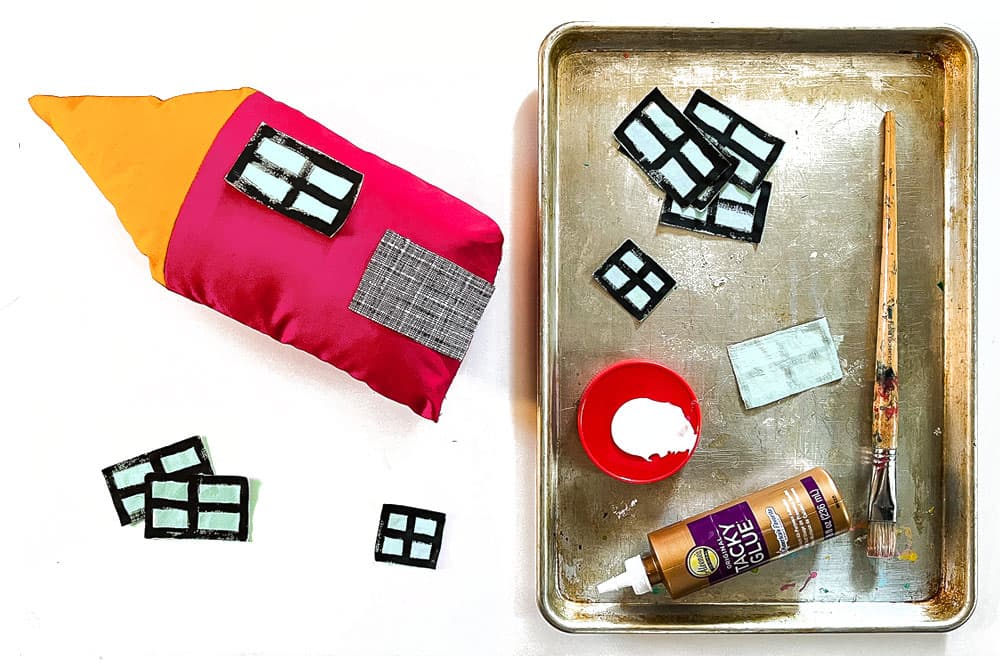
Apply fabric glue to the backs of your windows and doors. For this process, I find it easiest to squeeze some glue onto a plastic lid, then use an old stiff bristle brush to brush the glue onto backs – be sure you have an even coat of glue that gets all the way to the edges of your windows and doors.
If working with kids, you may want to try mixing a drop or two of water with your glue, then using a sponge to dab it onto the backs.

Using the same process, you can make trees and/or mountains to add to the landscaping of your village playset.
Kids can help bring their own landscapes to life by painting details or textures like leaves or branches on the trees. If painting, be sure to let them brush on their designs before sewing and stuffing.
Note: We stuffed our snowcap before hand-sewing shut around the bottom edge, creating a bit of dimension and adding to the illusion of snow cover. Because the mountain is our largest piece, it also required more beans at the bottom. You can use two to three small bags or switch to a resealable plastic snack bag size as we did.
Hurrah! It’s time to cut the red ribbon and open this town up for play! I love that the buildings and trees can be moved around for endless miniature city play setups. Because they are basically big pillowy bean bags, each village piece has a whimsical wobble and tilt that is so incredibly endearing – embrace the wonkiness, fellow perfectionists!
Here’s a small detail that tips your miniature village over the cuteness threshold: instead of gluing/sewing your doors down completely, only glue or sew along one side, for a door that opens and can provide a fun reveal! Which brings us to our next interactive element…
Open one of our doors, and you’ll be greeted by a fabric handpainted cutout person attached to the house facade with a velcro dot. We plan to make a whole set of Velcro elements (more people, some animals, etc.) that we can switch out for play. You could use this same concept to make a set of interchangeable velcro windows in different styles or filled with different kid-painted scenes.
Add a meandering paper stream or winding road. Put in a miniature community pool! For more tiny town design inspiration, visit our cardboard box city neighborhood and collection of over 50 dollhouses made from recycled supplies.
This soft city doesn’t really come to life until it’s filled with people! Up the artful play by inviting your kids to design their own set of DIY peg doll people.

Sewing projects have been a *journey* for me, and I feel so grateful to have met Trixie of Sew A Softie a few years ago. She’s a talented teacher, creative force, and champion of sewing enthusiasts of all ages.
Whenever I have an opportunity, I love to share her latest projects, so be sure to stop by her annual Kids Global Sewing Party – beginning this year on March 1st! Also, check out Trixie’s fabulous new books The Zenki Way and Sewing Simple Softies with 17 Amazing Designers (with a contribution by yours truly!).
If this project has inspired you to pull out a needle and thread, be sure to take a peek at our easy DIY crab softie (a beachy fan favorite!) or embrace your darker softie side with a devilishly adorable DIY Wednesday Addams.
Looking for more ways to meld handmade mini houses with artful play projects? Design your own DIY toy cars from scrap wood. Get out the drill for an easy upcycled scrap wood mid-century-inspired beach dollhouse or collage paper squares into an oversized cardboard book for your own foldout city landscape.
*A note about affiliate links: We strive to use simple, earth-friendly supplies that can be purchased locally whenever we can, but sometimes we find the best universally available options, a rare eco-friendly find, or a niche product only available on Blick Art Materials, Amazon, Etsy, or Woodpeckers Crafts. When included in our supply list, these products are affiliate links, and if you click through to make a purchase we receive a small commission that helps us re-order these supplies!
GETTING READY TO TRY this?
I love seeing all the ways people make these ideas their own! If you're sharing the results of one of our projects, mention or tag me with @barleyandbirch, or share it in the comments of one of our Pinterest project pins.


